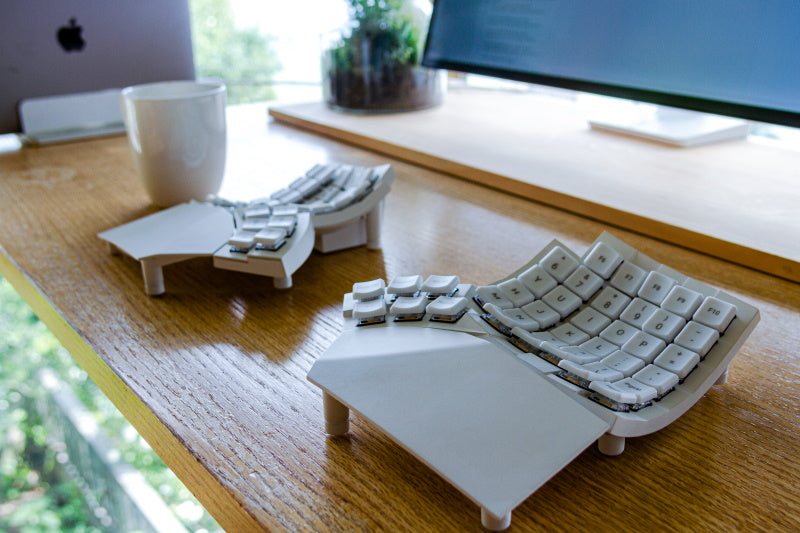
Glove80 is not just another ergonomic keyboard. It was an 8 year personal journey for Chris and I. As geeks who were attached to computers from a young age, both of us developed long-term and severe RSI. Many of our friends and colleagues too were in the same boat.
Back in 2014, Chris, a few friends and I decided to make a better contoured keyboard. Lilian Malt’s genius had introduced the world to Maltron and the contoured keywell; the comfort of a contoured keyboard is simply unmatched. Chris was very familiar with the Kinesis Advantage. However we knew a vastly improved contoured keyboard could be built using techniques that were not available to the earlier pioneers. 3D printing had opened the door to further experimentation.
Our goals were:
Superficially Glove80 may look similar to other contoured keyboards such as Maltron, Kinesis Advantage360, or Dactyl Manuform. However behind the casual similarities is a deep rethinking of every aspect of a contoured ergonomic keyboard, which has led to a set of important different design choices.
These design choices were validated by 500+ ergonomic experiments and hardware prototypes, and more than 6 years of long term testing.
This is an account of our eight-year journey and some of the design challenges we faced. We hope that this could provide useful insight for others who are on a similar journey.
Before we go further, here is a Glove80 typing test video:
We started off researching hand data and ergonomic information. We thought we could build a digital hand model, and from there determine the perfect ergonomic keyboard.
However once we dug into the scientific literature and academic databases, we were surprised to discover how sparse they were. The best we found were some papers on maximum digit movement with tiny sample sizes, and hand size databases that were limited to a very narrow set of data points such as length and width. However, to build a useful hand model we need far more, at a minimum:
It quickly became obvious that it would be futile to create a hand model, or to design an ergonomic keyboard using such a theoretical method. The required biomechanics data was simply missing.
Instead we decided to design the ergonomics using empirical methods. That’s a short way of saying "building lots of physical prototypes and doing real ergonomic testing on a wide range of real people".
The biggest challenge is to be able to build physical prototypes. Traditionally, building consumer product prototypes is an extremely time consuming and costly affair. Building a CAD model and making a CNC prototype takes a few thousand dollars and a week minimum per prototype.
Earlier pioneers often used clay models, but clay models have two problems. First, a clay model is simply not accurate enough; 1 degree change in angle or 0.2mm change in position are surprisingly significant in ergonomic design. Secondly, it is practically impossible to reverse engineer from a clay model back into a digital model for manufacturing with sufficient accuracy. Finally, a hand-made model is difficult and time-consuming to make functional, which makes it hard to evaluate ergonomic ideas with real-world typing.
Imagine what it takes to turn a clay model to a digital model like this, every time you make a new clay model
But in 2014, consumer 3D printing was finally becoming practical, so Chris and I each bought a 3D printer and we started playing. We were blown away by the power of 3D printing, but even so, printing a full keyboard took a full week of printing time.
Being software engineers and compiler writers who lived with optimizations day-in day-out, we quickly realized we could take our software experience into hardware engineering:
The goal was to build an ergonomic test jig that could work just like a real keyboard for extended long-term testing, while allowing us to easily optimize ergonomics.
An early fully-functional prototype, showing the replaceable end plates, caddies, thumb cluster and palm rest
Overall the ergonomic test equipment is composed of:
Our first attempt in designing a key column was a perfect circular arc. Circles are simple to draw, and there is beauty in their simplicity and regularity.
However, after five minutes of typing on the first prototype we realized our mistake. The human finger is composed of 3 separate segments which all bend together: with three pivot points, the finger tip moves in a shape very unlike a perfect circular arc. In fact the finger’s “natural” arc is much closer to the golden ratio spiral.
Golden ratio arc
After this realization, the exercise became a long quest to find the perfect arc shape for each finger. The pinky was especially tricky due to the huge variance of pinky lengths between people. After much experimentation, we found an arc shape that works for long pinkies and short pinkies alike. The resulting shape of that arc is nothing like a circle:
A small subset of the pinky finger caddies we experimented with. Each caddy has a unique code identifying the experiment.
This design isn’t universal among contoured keyboards: for example, Dactyl and Dactyl Manuform have opted to use circular arcs, while Kinesis Advantage largely defines the shape of its arcs using the contours of the keycap surfaces rather than the angle of the switches themselves.
Continue to Part 2...
Always interesting. Be the first to hear about new product releases and our behind-the-scene stories!


